Number 90. Woot, woot! I'm about 25% of the way there.
These cookies were inspired by a cookie I used to eat at my best childhood friend's house growing up. Michelle's mom always had these Golden Fruit biscuits on hand. They weren't super sweet. Just a soft, flaky biscuit with sweet, chewy raisins in the middle.
Years later, my mom found a similar cookie in a catalog and ordered some for me. They were indeed delicious, but like I've mentioned before, often times the memory is greater than the taste.
These cookies were delicious. Very scone or tea-biscuit like.
They were very much loved by my trusty taste tester #2 (my mom) and my mother-in-law (who was visiting this week).
These cookies are also super easy to make and I can see making them over and over again. Yum!
A few notes about the recipe:
1. Next time I'd chop the raisins a bit before adding them. The raisins were a bit big and I think needed to be pared down a bit. The inspiration biscuits had more of a chopped raisin filling - I don't know why I didn't stick with that.
2. While I like the technique I used for these (based on a currant cookie I've made before), I think next time I'll do more of a biscuit with a top and bottom crust. I think it'll work rolling out the one portion of the dough into a large rectangle, cover the raisins and then covering with the other rolled out portion.
3. Though the recipe I list below states milk, I used heavy cream. Totally not necessary, but I had it on hand and wanted to use it before it spoiled.
4. The turbinado sugar. Please don't use regular granulated white sugar. I know often times you can get away with using just regular granulated sugar for sprinkling on top, but in this case the coarse sugar really adds a nice crunch to a really soft and chewy biscuit. Regular granulated sugar, while adding the necessary sweetness, would just be lost.
Raisin Biscuits
1 cup flour
2 tbsp confectioner's sugar
1 tsp baking powder
1/4 tsp salt
1 tsp vanilla
1/2 cup unsalted butter, cut in to cubes and cold
2 tbsp milk
1 egg, beaten with 2 tsp cold water
1 cup raisins
2 tbsp turbinado sugar (Sugar in the Raw)
In the bowl of a food processor, combine flour, confectioner's sugar, baking powder and salt. Pulse a few times to combine. Add butter and pulse until crumbly and the texture of coarse sand.
Add vanilla and milk and pulse until the mixture forms a ball.
Divide dough in half, wrap with plastic wrap and chill for at least 2 hours.
Preheat oven to 350 degrees F.
On a well floured work surface, roll one portion of dough into a rectangle about 12" long and 1/8" thick. Brush surface of dough with egg wash and sprinkle half the dough evenly with half of the raisins. Fold the dough onto itself, sandwiching the raisins inside. Lightly roll the dough again until about 6" wide and 12" long. Fold the dough in half lengthwise again and transfer the entire piece to a parchment lined cookie sheet.
Brush with egg wash and sprinkle with 1 tbsp turbinado sugar. Cut the length of biscuits into 2-3" pieces using a pizza cutter (no need to separate them at this point, just cut them).
Repeat the process with the other portion of the dough.
Bake for 15-18 minutes until golden brown.
Thursday, September 30, 2010
Wednesday, September 29, 2010
Cookie #89 - Mini Jam Pie Cookies
In pastry, there are four classic doughs that are used:
Pate Brisee, traditional pie dough.


I am so excited with the way these cookies came out. I have a few set aside and I can't wait to share them this weekend with the folks at Dutch Hill Preserves. I hope they agree that my pastry showcases their delicious jam just perfectly.
Now, onto the recipe:
Mini Jam Pie Cookies
2 1/2 cups all purpose flour
2 tablespoons granulated sugar
1 cup unsalted butter, cold and cut into cubes
2 egg yolks
1/4 cup ice water
1 cup preserves of your choosing
1 egg beaten with 1 tsp cold water
a few tablespoons turbinado sugar (aka, Sugar in the Raw)
In the bowl of a food processor, add flour and sugar. Pulse a few times to combine. Add cold butter and pulse until crumbly and the texture of sand. Add egg yolks and pulse to combine. With the processor running, drizzle in the water until the mixture forms a ball. Wrap the ball in plastic and refrigerate for at least 2 hours or overnight.
Preheat oven to 375 degrees F.
On a well floured work surface, roll out portions of the dough until very thin - less than 1/4". Cut the dough using a 3" round cookie cutter. In the center of each circle, place about 1/2 - 1 tsp of jam. Don't over fill or this will happen:

Wet the edges of the circle with water and fold over. Press closed with your fingers and the crimp the edges using a fork. Place on a parchment lined baking sheet about 1" apart (they don't spread or puff too much so you can place them pretty close together).
Brush with beaten egg and sprinkle with turbinado sugar.
Bake for 12-15 minutes or until golden colored.
Pate Brisee, traditional pie dough.
Pate Sablee, a crumbly dough commonly used in tarts.
Pate a choux, which is a light airy dough used for cream puffs, eclairs, etc.
Pate sucree, a sweet pastry dough.
These cookies use pate sucree. If you've never made a pie dough, or are intimidated by it, this is a fantastic way to start. I find a pate sucree much easier to work than a traditional pie crust. Maybe it's the addition of the sugar and the egg yolks. Maybe it's the fact that when I make a pate sucree I tend to be a little less stressed than when I make a pie crust. Coming from a long line of pie-making women, I've got a lot to live up to. That puts a lot of stress on a girl.
The inspiration for these cookies came after I spent a weekend testing some apple pie recipes for an upcoming contest at my local farmer's market. I had a little pie crust left over and decided to bake off some little mini turnover like bits. I filled them with some strawberry preserves I had on hand.
I was disappointed.
I knew there had to be a better way. After realizing that the dough itself wasn't sweet enough for this application, I chose to use the pate sucree. Have I mentioned how much I love this dough? Now I had to decide the filling. As I reached for my jar of store-brand raspberry preserves, I remembered I had a jar of the most awesome berry preserves in my pantry.
Dutch Hill Preserves is a vendor at my local farmers' market. 95% of the fruit they use is local (75% they grow themselves). The other 5% is citrus and we all know you can't grow good citrus in Pennsylvania. I've hand quite a few of their jams & jellies, but their Triple Berry Jam is by far my favorite. There is no denying this is a real berry jam. As you spoon out the jam you will find whole strawberries, blueberries and blackberries.


I've never had jam so good. It is better than anything you can ever buy off the shelf at your grocery store. You can taste the freshness of the berries - they taste like the breezy Pocono mountains and the warm summer sun. Perfect to compliment my sweet pastry.
After baking off a batch, I couldn't wait to dig in. I had to execute some serious willpower - but hot jam burns and I wanted to really be able to enjoy these. The pastry was sweet and tender and the jam oozed just a little on first bite. The sweet and tart berries tingled my tongue. The raw sugar sprinkled on top added a little bit of a crunchy texture - I love that.
Don't they just look delicious? (ignore the one in the center on the bottom....I got a little over zealous with the jam).

I am so excited with the way these cookies came out. I have a few set aside and I can't wait to share them this weekend with the folks at Dutch Hill Preserves. I hope they agree that my pastry showcases their delicious jam just perfectly.
Now, onto the recipe:
Mini Jam Pie Cookies
2 1/2 cups all purpose flour
2 tablespoons granulated sugar
1 cup unsalted butter, cold and cut into cubes
2 egg yolks
1/4 cup ice water
1 cup preserves of your choosing
1 egg beaten with 1 tsp cold water
a few tablespoons turbinado sugar (aka, Sugar in the Raw)
In the bowl of a food processor, add flour and sugar. Pulse a few times to combine. Add cold butter and pulse until crumbly and the texture of sand. Add egg yolks and pulse to combine. With the processor running, drizzle in the water until the mixture forms a ball. Wrap the ball in plastic and refrigerate for at least 2 hours or overnight.
Preheat oven to 375 degrees F.
On a well floured work surface, roll out portions of the dough until very thin - less than 1/4". Cut the dough using a 3" round cookie cutter. In the center of each circle, place about 1/2 - 1 tsp of jam. Don't over fill or this will happen:

Wet the edges of the circle with water and fold over. Press closed with your fingers and the crimp the edges using a fork. Place on a parchment lined baking sheet about 1" apart (they don't spread or puff too much so you can place them pretty close together).
Brush with beaten egg and sprinkle with turbinado sugar.
Bake for 12-15 minutes or until golden colored.
Monday, September 27, 2010
Cookie #88 - Marzipan Cookies
Favorite Taste Tester #1, aka my husband Corey, LOVES marzipan.
When I bought the tube of almond sugar love home from the grocery store, I had to hide it.
Usually, I can just safely write on the package of something with black marker:
"FOR A RECIPE! DO NOT EAT!"
I didn't trust my Sharpie warning to ward off a hungry, scavenging Corey.
This inspiration for this cookie comes from a blog I found, Jeena's Kitchen. After adapting the recipe for my kitchen, I think they came out pretty good. I did cover my marzipan balls with a little more batter than shown with the original recipe. The result was a larger cookie with a little nugget of marzipan inside.
 Marzipan Cookies

When I bought the tube of almond sugar love home from the grocery store, I had to hide it.
Usually, I can just safely write on the package of something with black marker:
"FOR A RECIPE! DO NOT EAT!"
I didn't trust my Sharpie warning to ward off a hungry, scavenging Corey.
This inspiration for this cookie comes from a blog I found, Jeena's Kitchen. After adapting the recipe for my kitchen, I think they came out pretty good. I did cover my marzipan balls with a little more batter than shown with the original recipe. The result was a larger cookie with a little nugget of marzipan inside.
I made these cookies in my food processor fitted with a steel blade. I was inspired by an episode of Nigella Feasts. I watched as she made cupcakes in a food processor and basically just dumped all the ingredients in and gave it a whirl. While I wouldn't recommend it for all cookie recipes, it worked pretty well for these.
The flavor of the cookie was quite nice. Sweet and spicy - much like an oatmeal cookie without the oatmeal texture. I may try working with this batter in different ways. I have a few ideas I'm anxious to try.
For now, we have marzipan goodness for you...
 Marzipan Cookies
1/2 cup butter
1/2 cup sugar
2 tbsp milk or heavy cream (I had heavy cream on hand so used that)
1 1/2 cup flour
1/2 tsp baking powder
1/2 tsp baking soda
1/8 tsp salt
1/2 tsp cinnamon
1/4 tsp nutmeg
2 egg whites
1 whole egg
1 tsp vanilla
7 oz package of marzipan
Preheat oven to 375 degrees F.
Roll marzipan into balls about 1/2" and place on a parchment lined baking sheet.
In the bowl of a food processor, cream butter and sugar together.
Add flour, baking soda, baking powder, salt, cinnamon and nutmeg. Pulse to combine.
Add milk (or cream), egg whites, egg and vanilla. Mix until well combined.
Drop teaspoons full of batter over each ball of marzipan. To prevent the balls from rolling away, slightly flatten them. I didn't do this and ended up with some sloppy looking cookies since I had to chase them around the sheet pan a little.
Bake for 10-12 minutes until golden.
Transfer to a wire rack to cool.
ENJOY!!

Friday, September 24, 2010
Cookie #87 - Raspberry Jam Strips
One of the nicest comments I've received about my blog was from a reader who said it was so "real."
That is my goal.
It was never my intent to only show you the good that comes out of my kitchen. If I'm to grow as a baker, I don't feel the need to hide my mistakes. By putting my errors out there, I hope for the constructive criticism from other bakers and food lovers alike.
I'm also not afraid to tell you when I don't like something. For example, describing the scent of my Wisconsin Cheddar Cookies as nauseating. Who does that? This girl.
By the way, those cookies were a huge hit with my favorite taste tester, Corey. He still talks about them.
Now I bring you Raspberry Jam Strips.
After some of the more daring and different cookies I've made, these were rather plain. My mom loved them. She normally tries to stear clear of eating many of my cookies (I admire her willpower) but she just couldn't stay away from these. I think they remind her of the linzer tarts my father used to buy her. Deep down, it makes me so happy that I was able to recreate a flavor that brings back such happy memories for her.
The inspiration for this cookie came after I watched an old episode of Food Network Challange.
Theresa Cannavo, who gets mad props for her gingerbread bird houses, make Papa's Boysenberry Ropes.
Did I just write 'mad props?' Remind me never to do that again.
I really liked the idea of making long ropes of cookies and then cutting after baking - much like the way biscotti is made.
Since I had some raspberry preserves in the fridge, I chose to use it up for this cookie. I made a basic butter cookie base and after forming into logs, I created a trough in the center. After baking, I filled the center with the raspberry jam and cut into 1" wide pieces. Actually, Corey cut them because I was called upstairs to fight a monster in Sydney's closet. Damn monsters. Though I know I'll miss them when they're gone.
The flavors of this cookie were very simple and very straightforward. Butter cookie. Raspberry. Nothing develops late on your palate. Nothing tickles your nose after a few bites. Simple - and sometimes simplicity can be beautiful.
If you like jam thumbprints, these cookies are a good substitute. They're easier to make, since you don't have to roll individual cookies. I suppose if you wanted, you could sprinkle some chopped nuts on top of the raspberry preserves to really get that thumbprint flavor. Also, since the dough itself is rather nondescript (aside from being buttery) you could replace the raspberry jam with whatever flavor floats your boat. They'd be scrumptious with fig filling and a little cinnamon & nutmeg added to the cookie dough.
I'm positive I'll be making these cookies again. They disappeared from my kitchen lickety split and I've already had requests for another batch.
Raspberry Jam Strips
1 1/4 cups flour
3 tablespoons sugar
1/2 cup butter
1/2 cup raspberry jam
Preheat oven to 325 degrees F.
Cream butter and sugar. Mix in flour until a dough forms.
Divide the dough in half. Shape each half of the dough on a parchment lined baking sheet into a log about 9" long. Using the handle of a wooden spoon (or your fingers) make an indentation down the length of the dough.
Bake for 20-25 minutes until golden.
Immediately after removing from the oven, spoon raspberry jam into the indentation. Cut the strips into 1" pieces. Transfer to a wire rack to cool completely.
Thursday, September 23, 2010
Cookie #86 - Lemon Cookies
I've mentioned before, my favorite Girl Scout cookie of all time was the Lemon Pastry Cremes. They were this wonderfully delicious lemon sandwich cookie.
I know what you're thinking: But the Girl Scouts sell a lemon cookie!
No.
The Lemon Chalet Cremes are NOT the same.
Let me 'splain..
Lemon Pastry Cremes was made up of these two really delicate, subtly flavored lemon cookies. They were flaky and lightly coated with a sweet glaze. Inside was the most wonderful, creamy, lemony filling. The lemon flavor wasn't too overpowering, but rather just enough.
I've been dying to recreate this cookie for some time now. To be honest, I know I'll never be able get an exact replica of my beloved cookie. I think I'm romanticizing the flavor - even if I tasted one of those cookies now, it wouldn't be as good as I remember.
These cookies, however, were quite delicious.
They were very lemony. In fact, I think maybe a bit too lemony. The cookie was very flavorful with the addition of the lemon zest, I don't really think the lemon juice was needed for the glaze. They were still mouth-puckering good. Because of the lemon flavor, I chose not to sandwich these cookies. I had the feeling that sandwiching these cookies with even more lemon goodness would just kill it. Sometimes you just have to know when to stop.
Lemon Cookies
3/4 cups all purpose flour
1/2 cup cake flour
1/2 tsp cream of tartar
1/4 baking soda
1/4 cup salt
1/2 cup butter
1 tbsp lemon zest
3/4 cup sugar
2 egg yolks
2 tbsp lemon juice
1/2 tsp vanilla
Sift together flours, cream of tartar, baking soda and salt. Set aside.
Cream butter and sugar together until smooth. Add egg yolks and lemon zest until well combined.
Mix in lemon juice and vanilla.
Mix in flour mixture slowly until just combined.
Chill the dough for at least 30 minutes.
Preheat oven to 350 degrees F.
Roll tablespoons full of dough into balls, place balls 2" apart onto parchment lined cookie sheets.
Using slightly moistened fingers, flatten each ball into a 2" disk.
Bake for 15-18 minutes, rotating baking sheets halfway through.
If desired, pour lemon glaze over cookies while still warm.
Lemon Glaze
1 cup sifted confectioners sugar
2 tbsp lemon juice
1 tbsp light corn syrup
Whisk ingredients together and pour over warm cookies.
Monday, September 20, 2010
Cookie #85 - Peanut Butter Chocolate Marble
Oh. My.
These have to be the best cookies I've made thus far. Peanut butter and chocolate is one of my best friend's favorite flavor combinations. I knew I wanted to make her a peanut butter cookie, only better. I must say, I succeeded.
Now, before I throw my shoulder out patting myself on the back, let me give you the recipe...

Bake for 20-25 minutes until edges are golden.
Transfer to a wire rack to cool.
These have to be the best cookies I've made thus far. Peanut butter and chocolate is one of my best friend's favorite flavor combinations. I knew I wanted to make her a peanut butter cookie, only better. I must say, I succeeded.
Now, before I throw my shoulder out patting myself on the back, let me give you the recipe...

Peanut Butter Chocolate Marble
1 cup butter
1 cup creamy peanut butter
3/4 cup granulated sugar
3/4 cup packed dark brown sugar
2 eggs
2 tsp vanilla
2 cups flour
1/2 tsp baking soda
1/4 tsp salt
12 oz milk chocolate
Preheat oven to 300 degrees F.
Melt milk chocolate, either in a double boiler or the microwave, and set aside to cool.
Cream butter and peanut butter together until well combined and smooth. Add sugars and mix until well incorporated. Mix in eggs, one at a time, beating well after each addition. Mix in vanilla.
Sift together dry ingredients and add slowly to the butter mixture mixing until just combined.
Drizzle the melted chocolate all over the dough. Drag a large spoon through the dough. Do not fully mix the chocolate into the dough - you want to create a marble effect with streaks of chocolate.
Drop 1/4 cups full of dough, 3" apart onto parchment lined baking sheets.Bake for 20-25 minutes until edges are golden.
Transfer to a wire rack to cool.
Cookie #84 - Amish Drop Sugar Cookies
Um, hello? Where the heck did I go? It's like I disappeared into cyber-cookie-space. Did you miss me?
In truth, I have been an emotional wreck for the past 4 days. It just seemed like one thing after another was going wrong and I was just fed up. All I wanted to do was hide, so hide I did....but, I also baked. Baking helps me unwind. It helps me escape from my crazy daily life and forget my problems
Now, before you get too worried, it was nothing serious. In fact, now that I look back on it, it was all quite petty and I feel almost silly for the way I reacted to the situation. I had some issues with my 1960's era Singer sewing machine. When I inquired about getting the part to repair it, I was told it could take up to 6 weeks for the part to come in IF they could get the part at all. I was mad. How am I supposed to sew Halloween costumes now? I overreacted. More things were broken. Tears were shed. I acted like a three-year-old and pouted for the next two days. Finally, after a visit to another sewing machine repair shop, a $1.50 spool pin and a little help from a drill, my husband (who is a saint for putting up with me) fixed the machine.
Enough about that - let's talk cookies. First up - Amish Drop Sugar Cookies.
As I was making them, my husband asked me: "What makes them Amish?"
Why sour cream, of course! The sour cream makes these cookies soft and moist.
The recipe, which was given to me by a PA native, didn't call for a frosting or glaze for the cookie.
I'm going to be honest - they need one. The cookies themselves were quite sweet, but rather bland. I was really craving a sweet, creamy, sugary topping. I toyed with the idea of different flavors of frosting - vanilla, chocolate, lemon. Unfortunately, the batch of cookies didn't last long enough for me to frost them. Next time...
Amish Drop Sugar Cookies
1 1/2 cups sugar
1 cup butter
2 eggs
1 cup sour cream
3 3/4 cups flour
2 tsp baking powder
1 tsp baking soda
1 tsp vanilla
Preheat oven to 375 degrees F.
Cream butter and sugar together until smooth. Mix in eggs, beat well. Add sour cream and vanilla, beat well. Sift together dry ingredients and add to the butter mixture, mixing until well incorporated. Drop rounded tablespoons full onto parchment lined baking sheets. Bake for 8-10 minutes, or until the edges just start to turn color.
Transfer to a wire rack to cool.
Wednesday, September 15, 2010
Cookie #83 - Fortune Cookies
It took me four tries to finally get these cookies to work and even now, I'm not 100% happy with the way they came out. I didn't get that snappy crisp throughout the whole cookie. I finally got the dough right, I just really need to work on the baking time, I think. I'm not quite sure what went wrong. I tried variations and combinations of 3 different recipes. This is the recipe that gave me the easiest batter to work with and the one that I feel had the most realistic fortune cookie flavor. Most of the recipes I viewed cooked the cookies at a high temperature for a long time. I think the next time I try these, it'll be at a lower temperature for a lower time. Perhaps that's the key for getting that golden color and crispy texture. Either way, they were quite yummy and I enjoyed the ones that came out prettiest (and those that didn't). The recipe below gives the measurements and baking times I used.

I'd like to add that I read several recipes where people mentioned that they made hundreds of these for weddings and showers and various parties. After my fortune cookie experience, I can never imagine doing that! I'll stick to getting mine from my local Chinese restaurant.

Fortune Cookies
1 egg white
1/8 tsp vanilla
1/2 tsp almond extract
1 pinch salt
1 tbsp melted butter
1/4 cup flour
1 tbsp water
2 tbsp sugar
Preheat oven to 400 degrees.
Whisk egg white until foamy. Whisk in vanilla, almond extract, and melted butter.
Sift in flour, salt, and sugar.. Whisk until smooth. If the batter is too thick, add the water. You want the batter to be the texture of pancake batter.
Drop teaspoons full of the batter onto a greased cookie sheet (I actually used a Silpat) about 4" apart. Rotate the cookie sheet around to spread the batter into even circles, about 3-4" across.
Bake for 5 minutes.
Remove from the oven and begin working immediately and quickly. Remove cookies from the cookie sheet one at a time. Fold in half and press lightly on just the edges (place your paper fortunes inside at this point if you wish). Fold the two corners towards each other to create the classic fortune cookie shape.
Place each cookie into the cup of a muffin tin to retain shape while the cookies set.
At this point, once I had all the cookies folded and in the muffin tin, I returned them to the oven, lowered the temperature to 350 degrees F and baked for an additional 10 minutes to achieve a golden color.
Tuesday, September 14, 2010
Cookie #82 - Biscotte d'Vino
Whenever I'm sitting by a crystal blue Italian stream kissing Valentino, I like to enjoy a nice glass of red wine (bonus points if you get the music reference). In between being fed grapes by some Italian stallion, I enjoy dipping one of these cookies into the wine.
Okay, not really, but I do love these cookies with my morning beverage of choice, Diet Coke - yes I'm one of those. Don't judge.
They're not very sweet and have just a hint of anise flavor. They have an interesting crumbly texture, yet they aren't dry. The recipe below makes enough biscotte to feed a small Italian village. I usually halve the recipe and it yields over 2 dozen cookies.

2/3 cup sugar
2 tsp vanilla
Preheat oven to 375 degrees F.
Beat 6 eggs, oil, sugar, vanilla & anise extract together until well mixed and light yellow.
Sift 4 cups flour, baking powder and salt. Add to egg mixture in batches, until just combined.
Sprinkle remaining 1/4 cup flour over the dough and knead it in gently with your hands.
Roll tablespoons of dough into logs about 3" long. Shape into an "S" shape. Place on parchment lined baking sheets about 2" apart.
Beat remaining egg with 1 tsp cool water. Brush cookies with egg wash.
Bake for 10-15 minutes until puffed and golden brown.
Okay, not really, but I do love these cookies with my morning beverage of choice, Diet Coke - yes I'm one of those. Don't judge.
They're not very sweet and have just a hint of anise flavor. They have an interesting crumbly texture, yet they aren't dry. The recipe below makes enough biscotte to feed a small Italian village. I usually halve the recipe and it yields over 2 dozen cookies.

Biscotte d'Vino
6 eggs + 1 for egg wash
1/2 cup oil (I used canola oil, but I'm curious what olive oil would do to the final product)2/3 cup sugar
2 tsp vanilla
1 tsp anise extract (I'm sure almond would be good, too)
4 tbsp (yes, tablespoons) baking powder
1/2 tsp salt
4 cups + 1/4 cup flourPreheat oven to 375 degrees F.
Beat 6 eggs, oil, sugar, vanilla & anise extract together until well mixed and light yellow.
Sift 4 cups flour, baking powder and salt. Add to egg mixture in batches, until just combined.
Sprinkle remaining 1/4 cup flour over the dough and knead it in gently with your hands.
Roll tablespoons of dough into logs about 3" long. Shape into an "S" shape. Place on parchment lined baking sheets about 2" apart.
Beat remaining egg with 1 tsp cool water. Brush cookies with egg wash.
Bake for 10-15 minutes until puffed and golden brown.
Monday, September 13, 2010
Cookie #81 - Mallomars
While grocery shopping the other day, I was super excited to see the first batch of Mallomars out this season. The delicate chocolate coating melts easily in the heat of the summer months. Because of this, Nabisco limits their production to September through April. I have heard of the extreme Mallomar connoisseur stockpiling Mallomars in their freezers to last them the summer.
I found the slightly under baked graham crackers to be the perfect base for these cookies. The soft, honey flavor and grainy texture reminded me of the Mallomar cookie.
Now what about the marshmallow?
I toyed with the idea of using half of a jumbo marshmallow on top of the cookie, but the texture wasn't right. The marshmallow needed to be softer. Marshmallow fluff wouldn't work because it's TOO soft.
Finally, I resorted to making my own marshmallow.
The task of making marshmallows from scratch sounds a little daunting. I was actually surprised how easily it came together. The hardest part was getting the mixture into the piping bags before it started to set. You have to work quickly. It's important to have everything you need set out, waiting for you so you're not scrambling. Also, prepare to get messy. This is sticky, runny stuff.
I was quite pleased with the way these came out. The chocolate snapped just right. The marshmallow was nice and fluffy and the cookie was soft. Just right to get you through the Mallomar-less summer months!


Homemade Mallomars
Cookie Base
2 1/2 cups + 2 tbsp flour
1 cup dark brown sugar
1 tsp baking soda
3/4 tsp salt
7 tbsp butter, cold and cut into cubes
1/3 cup honey (I used local honey)
5 tbsp whole milk
2 tbsp (yes, tablespoons) vanilla
In the bowl of a food processor, combine flour, sugar, baking soda, and salt, pulsing 5-6 times to combine. Add chilled butter and pulse until the mixture resembles coarse meal.
In a small bowl, mix together honey, milk, and vanilla. With the food processor running, drizzle in the milk mixture until the dough just comes together.
Divide the dough in half and form into a ball, dust lightly with flour and wrap tightly in plastic wrap. Refrigerate for at least 2 hours.
Roll dough out on a lightly floured surface about-1/4" thick.
Cut dough out with a 2" circle cookie cutter and place parchment lined baking sheets. Chill at least 30 minutes before baking.
Preheat the oven to 350 degrees. Bake for 10 minutes or until they just start to turn golden at the edges.
Transfer to a wire rack to cool.
While the cookies cool, make the marshmallow.
Marshmallow
1 envelopes unflavored gelatin
1 cup cold water, divided
2 cups granulated sugar
1/2 cup light corn syrup
1/4 tsp salt
2 egg whites
1 tablespoon vanilla
1 lb dark chocolate for coating
In a large bowl, sprinkle gelatin over 1/2 cup cold water, let stand to soften.
In a medium sauce pan, combine granulated sugar, corn syrup, salt and 1/2 cup cold water. Place over low heat, stirring until the sugar is dissolved. Increase the heat to medium and bring the mixture to a boil. Continue boiling, without stirring, until mixture reaches 240 degrees on a candy thermometer, about 10 minutes. Poor mixture over the gelatin and stir until the gelatin is dissolved.
Beat the mixture on high speed until thickened and white and nearly tripled in volume. This will take about 5-10 minutes depending on whether you use a hand or stand mixer.
In a separate bowl, whisk egg whites until stiff. Beat whites and vanilla into the sugar/gelatin mixture until just combined.
Working quickly, transfer the mixture into piping bags or zip top freezer bags (it filled 3 for me). Immediately pipe globs of marshmallow onto the cookie bases. Transfer the marshmallow topped cookies to the fridge to harden, at least 3 hours. Place an additional empty cookie sheet in the freezer.
Once the marshmallows are firm, melt chocolate in a double boiler until smooth. Dip the marshmallow topped cookies in the melted chocolate, shaking off any excess, until evenly coated. Place coated cookies onto the frozen cookie sheet lined with parchment paper. Once all the cookies are dipped, put them back in the fridge until the chocolate is set.
Why not make your own instead?
Now what about the marshmallow?
I toyed with the idea of using half of a jumbo marshmallow on top of the cookie, but the texture wasn't right. The marshmallow needed to be softer. Marshmallow fluff wouldn't work because it's TOO soft.
Finally, I resorted to making my own marshmallow.
The task of making marshmallows from scratch sounds a little daunting. I was actually surprised how easily it came together. The hardest part was getting the mixture into the piping bags before it started to set. You have to work quickly. It's important to have everything you need set out, waiting for you so you're not scrambling. Also, prepare to get messy. This is sticky, runny stuff.
I was quite pleased with the way these came out. The chocolate snapped just right. The marshmallow was nice and fluffy and the cookie was soft. Just right to get you through the Mallomar-less summer months!


Homemade Mallomars
Cookie Base
2 1/2 cups + 2 tbsp flour
1 cup dark brown sugar
1 tsp baking soda
3/4 tsp salt
7 tbsp butter, cold and cut into cubes
1/3 cup honey (I used local honey)
5 tbsp whole milk
2 tbsp (yes, tablespoons) vanilla
In the bowl of a food processor, combine flour, sugar, baking soda, and salt, pulsing 5-6 times to combine. Add chilled butter and pulse until the mixture resembles coarse meal.
In a small bowl, mix together honey, milk, and vanilla. With the food processor running, drizzle in the milk mixture until the dough just comes together.
Divide the dough in half and form into a ball, dust lightly with flour and wrap tightly in plastic wrap. Refrigerate for at least 2 hours.
Roll dough out on a lightly floured surface about-1/4" thick.
Cut dough out with a 2" circle cookie cutter and place parchment lined baking sheets. Chill at least 30 minutes before baking.
Preheat the oven to 350 degrees. Bake for 10 minutes or until they just start to turn golden at the edges.
Transfer to a wire rack to cool.
While the cookies cool, make the marshmallow.
Marshmallow
1 envelopes unflavored gelatin
1 cup cold water, divided
2 cups granulated sugar
1/2 cup light corn syrup
1/4 tsp salt
2 egg whites
1 tablespoon vanilla
1 lb dark chocolate for coating
In a large bowl, sprinkle gelatin over 1/2 cup cold water, let stand to soften.
In a medium sauce pan, combine granulated sugar, corn syrup, salt and 1/2 cup cold water. Place over low heat, stirring until the sugar is dissolved. Increase the heat to medium and bring the mixture to a boil. Continue boiling, without stirring, until mixture reaches 240 degrees on a candy thermometer, about 10 minutes. Poor mixture over the gelatin and stir until the gelatin is dissolved.
Beat the mixture on high speed until thickened and white and nearly tripled in volume. This will take about 5-10 minutes depending on whether you use a hand or stand mixer.
In a separate bowl, whisk egg whites until stiff. Beat whites and vanilla into the sugar/gelatin mixture until just combined.
Working quickly, transfer the mixture into piping bags or zip top freezer bags (it filled 3 for me). Immediately pipe globs of marshmallow onto the cookie bases. Transfer the marshmallow topped cookies to the fridge to harden, at least 3 hours. Place an additional empty cookie sheet in the freezer.
Once the marshmallows are firm, melt chocolate in a double boiler until smooth. Dip the marshmallow topped cookies in the melted chocolate, shaking off any excess, until evenly coated. Place coated cookies onto the frozen cookie sheet lined with parchment paper. Once all the cookies are dipped, put them back in the fridge until the chocolate is set.
Enjoy!!
Sunday, September 12, 2010
Cookie #80 - Graham Crackers
When I was a little girl, I thought graham crackers were actually called "Gram crackers" for my grandmother. When I was in elementary school, I remember coming home and she having graham crackers and grape jelly ready for me.
These cookies were not difficult to make. The dough was fragrant and very easy to work with. I baked the for two different cooking times and achieved two seemingly different cookies. One very soft with a subtle honey flavor and one much crispier with a stronger, darker flavor (the ones pictured are the longer baked variety). Both cookies were delish and I encourage you to try both baking times to find the way you like your homemade graham crackers.

Homemade Graham Crackers
2 1/2 cups + 2 tbsp flour
1 cup dark brown sugar
1 tsp baking soda
3/4 tsp salt
7 tbsp butter, cold and cut into cubes
1/3 cup honey (I used local honey)
5 tbsp whole milk
2 tbsp (yes, tablespoons) vanilla
Cinnamon sugar topping (1/4 cup sugar mixed with 1 tsp cinnamon)
In the bowl of a food processor, combine flour, sugar, baking soda, and salt, pulsing 5-6 times to combine. Add chilled butter and pulse until the mixture resembles coarse meal.
In a small bowl, mix together honey, milk, and vanilla. With the food processor running, drizzle in the milk mixture until the dough just comes together.
Divide the dough in half and form into a ball, dust lightly with flour and wrap tightly in plastic wrap. Refrigerate for at least 2 hours.
Roll dough out on a lightly floured surface until between 1/8-1/4" thick.
To cut them, use a pizza cutter to cut the dough into rectangles about 3" wide by 6" long. Place the rectangles onto parchment lined baking sheets. Using a fork, create perforations that divided each cracker into 4 equal pieces - be sure to pierce all the way through the dough. Then lightly prick the dough all over using the fork, this time being careful not to pierce all the way through.
Chill the cut out squares for at least 30 minutes before baking.
Preheat the oven to 350 degrees. Sprinkle the cookies with the cinnamon sugar topping. Bake the cookies depending on the type of cookie you want to achieve:
For the softer, more mild cookie, bake for about 10 minutes until they just start to turn golden.
For the crispier, stronger flavored cookie, bake for 15 minutes until they are dark and firm.
Transfer to a wire rack to cool.
Saturday, September 11, 2010
Cookie #79 - Frosted Animal Cookies
I have this very vivid memory from my childhood of grocery shopping with my mom at our local Grand Union. There was an area in the front of the store where the carts were kept that was cordoned off with shiny, metal railings. I would sit on the railing with my stuffed horse (and very best friend) Pineapple and a box of animal crackers while my mom shopped. Can you imagine doing that nowadays?
Animal crackers/cookies are such a kid favorite. The ones in the little red box with the string are probably the most popular, but frosted animal cookies are pretty awesome, too.
These cookies are essentially just a really delicious sugar cookie, rolled thin and frosted with some sweet icing on top. I added just a tiny bit of cinnamon to the dough and I was quite happy with the slightest bit of warmth it added.
These cookies don't have to be frosted. I think they'd be quite delicious simply dusted with some cinnamon sugar.
I cut my cookies out with two vintage cookie cutters I bought a few years ago at a garage sale. The horse shape reminds me of the Ikea horse. As I was testing out this recipe, I really wished I had the Williams-Sonoma Circus Animal Cracker Cookie Cutters, but they had been discontinued. They would have been perfect. They had all the famous shapes: a lion, giraffe, tiger, elephant and even the seal balancing a ball on it's nose. I found a few sets on eBay, but I just couldn't justify over $30 for a set of cookie cutters.
No matter how you choose to cut them, it's still a pretty darned good cookie.

To make icing:
Animal crackers/cookies are such a kid favorite. The ones in the little red box with the string are probably the most popular, but frosted animal cookies are pretty awesome, too.
These cookies are essentially just a really delicious sugar cookie, rolled thin and frosted with some sweet icing on top. I added just a tiny bit of cinnamon to the dough and I was quite happy with the slightest bit of warmth it added.
These cookies don't have to be frosted. I think they'd be quite delicious simply dusted with some cinnamon sugar.
I cut my cookies out with two vintage cookie cutters I bought a few years ago at a garage sale. The horse shape reminds me of the Ikea horse. As I was testing out this recipe, I really wished I had the Williams-Sonoma Circus Animal Cracker Cookie Cutters, but they had been discontinued. They would have been perfect. They had all the famous shapes: a lion, giraffe, tiger, elephant and even the seal balancing a ball on it's nose. I found a few sets on eBay, but I just couldn't justify over $30 for a set of cookie cutters.
No matter how you choose to cut them, it's still a pretty darned good cookie.

Frosted Animal Cookies
Cookies:
2 cups flour
2/4 tsp baking soda
1/2 tsp salt
1/2 tsp cinnamon
1 1/4 cups sugar
1/2 cup butter
1 egg
2 tsp vanilla
Icing:
2 egg whites
2 tsp lemon juice
3 cups sifted confectioners sugar
Nonpareils for decoration
Cream butter and sugar together until smooth. Mix in egg, then vanilla until well incorporated.
Sift together flour, baking soda, salt, and cinnamon. Add slowly to butter mixture until just combined.
Divide dough in half. Form each half into a ball, then flatten into a disk. Wrap tightly with plastic wrap and refrigerate at least 1 hour.
Preheat oven to 350 degrees.
Working with one half of the dough at a time, roll out on a lightly floured work surface to about 1/4" thick. Cut into desired shapes, reworking scraps of dough as needed. Place cut cookies onto parchment lined baking sheets. Bake until the edges are just golden, about 15-20 minutes. Transfer to a wire rack to cool.
To make icing:
Whisk egg whites just until stiff. Whisk in lemon juice and powdered sugar until well combined. If too thick, thin with a little bit of water until the desired consistency. Frost each cookie and top with nonpareils. Allow the frosting to dry before storing.
Enjoy!!
Friday, September 10, 2010
Cookie #78 - Fig Newtons
I am currently working on creating a recipe to mimic the discontinued Girl Scout Lemon Pastry Cremes. I've almost got it, but in the mean time, I bring you another favorite of mine: The Fig Newton.
I L-O-V-E figs.
I have such an appreciation for the fruit. They are like little gems.
There is a restaurant here in town that has a fig appetizer that is to die for. It's fresh black mission figs stuffed with goat cheese , lightly broiled, and served with an arugula salad with Parmesan and a lemon vinaigrette.
It is one of the best things I have ever eaten.
As much as I love figs, I've never actually cooked with them. This was a first for me.
So, I headed out to the grocery store and bought 6 of the most beautiful figs.
They're lucky they made it home from the store. I could hear them calling to me from the produce bag. After I made the filling for these, I decided that next year I'm going to try my hand at canning. This filling is just too darn good to just use for these cookies. I can only imagine how good it is on an English muffin or even just a plain piece of toasted homemade white bread.
My mouth is watering just thinking about it.
As for this recipe, I used a combination of several recipes I had come across. I can't say they tasted just like a Fig Newton, but they were very good. I had some difficulty getting the same filling to cookie ration as the originals. I think the filling needs to be chilled just a bit more to help hold it's shape as you from the biscuits. I will also double the amount of filling I make. As you can see the cookies don't have that much filling in them. They really needed more. They also needed me to stop eating the filling as I went along.

Fig Newtons
Dough:
2 1/2 cups all purpose flour
1/2 cup cake flour
1/2 cup sugar
1/2 tsp vanilla
1/2 tsp salt
1 tsp baking powder
1/2 tsp baking soda
1/2 tsp cinnamon
1/4 tsp nutmeg
3/4 cups butter
3 eggs Filling:
1 orange
1 cup apple juice
1/2 tsp cinnamon
1/4 tsp nutmeg
4 tbsp sugar
1 additional egg whisked with 1 tsp cool water
First, make the dough so it has time to chill.
Cream butter and sugar together until creamy. Mix in three eggs and vanilla until well combined.
Sift together flour, salt, baking powder, baking soda, and spices. Add slowly to butter mixture until dough is formed. Wrap in plastic and refrigerate for 1 hour.
Meanwhile, make filling.
Zest the orange, set aside. Juice the orange and add water until it measures 1 cup.
Combine zest, orange juice and all remaining ingredients in a sauce pan and cook over medium heat, stirring often, until mixture has thickened - about 15 minutes. Transfer mixture to a blender or food processor and puree until smooth. Refrigerate until fully cooled.
Preheat oven to 375 degrees.
Roll dough out on a lightly floured surface into a rectangle about 1/8" thick. Cut dough lengthwise into 3" strips.
Spoon filling down the middle of each strip. Brush edges lightly with egg wash and fold over the dough to seal in the filling. Place each strip seam side down onto parchment lined baking sheets. Brush with egg wash. Repeat with remaining dough and filling.
*I used fresh figs. If you choose to use fresh, make sure they are nice and firm, not soft and squishy. I've seen recipes that used dried figs when making the filling or even substituted premade fig preserves.
Enjoy!
Cookie #77 - Shortbread
Since I used a shortbread base for the Samoas and Peanut Butter Patties, I thought I'd share with you how I bake just plain shortbread. There's something so comforting about these cookies. They're sweet and flaky and buttery rich. Eating a homemade shortbread cookie reminds me of snow days and Christmas Eve.
The best part is how super easy they are to make!
I promise.
If you've never made a cookie before, these are the perfect starter cookie. I can't wait until my girls are old enough so I can teach them how to make these.
I hope you love them as much as I do.

Shortbread Cookies
1 cup butter, softened
2 cups flour
1/2 cup confectioners sugar
1/4 tsp salt
1 egg whisked with 1 tsp cool water
Sift together flour, sugar and salt.
Cream butter until smooth. Add flour mixture until just combined.
You can bake this one of two ways:
Version #1: Press dough into an 8x8" pan. Using a fork, pierce the dough all over. Brush with egg wash. Bake at 325 degrees for 25 minutes. While still warm, cut dough into squares. Allow to cool for about 10-15 minutes in the pan and then transfer to a wire rack to cool completely.
Version #2: After the dough is formed, knead it lightly and form into a ball. Wrap in plastic wrap and flatten into a disk. Refrigerate for 30 minutes.
Preheat oven to 325 degrees. Roll dough out on a lightly floured surface until 1/4" thick. Cut out cookies in desired shapes and place on a parchment lined baking sheet. Brush with egg wash. Bake for 20-25 minutes or until edges are lightly browned. Rotate the cookie sheets halfway through baking time. Transfer to a wire rack to cool.
Enjoy!
Wednesday, September 8, 2010

Cookie #76 - Thin Mints
The first time I heard about this knock-off Thin Mint recipe, I didn't believe it was actually good. I must say, this version does come very close to the original. The crisp cracker center mimics the chocolate cookie almost perfectly. I didn't find them nearly as minty as I would have liked them, but that could easily be fixed with the addition of some more peppermint extract.
Again, I made the mistake of using semisweet chocolate chips melted with shortening to coat these. They didn't harden well, much like the Peanut Butter Patties (note the finger prints on the picture below). I plan on making these again for Christmas and when I do, I'll use candy coating. Wilton even makes a chocolate mint flavored coating eliminating the need for the peppermint extract.
I've written the recipe out below using the measurements that I've found to be the same throughout the many different versions I've found across the net. I used the same amount of peppermint listed below for 12-oz of semisweet chocolate and I didn't find it minty enough. Most likely, it'll depend on your palate. My suggestion is to add the 1/2 tsp then taste the chocolate before dipping.

1 lb bittersweet chocolate (or dark chocolate candy coating)


Again, I made the mistake of using semisweet chocolate chips melted with shortening to coat these. They didn't harden well, much like the Peanut Butter Patties (note the finger prints on the picture below). I plan on making these again for Christmas and when I do, I'll use candy coating. Wilton even makes a chocolate mint flavored coating eliminating the need for the peppermint extract.
I've written the recipe out below using the measurements that I've found to be the same throughout the many different versions I've found across the net. I used the same amount of peppermint listed below for 12-oz of semisweet chocolate and I didn't find it minty enough. Most likely, it'll depend on your palate. My suggestion is to add the 1/2 tsp then taste the chocolate before dipping.

Thin Mints
80 Ritz crackers
1/2 tsp peppermint extract*
Before starting, place a cookie sheet in the freezer. Like I've mentioned before, putting the sheet in the freezer will help you achieve a nice smooth bottom. You may also choose to put the Ritz crackers in the freezer as well to assist the chocolate setting smoothly.
In a double boiler, melt chocolate gently until smooth. Watch the chocolate carefully so it doesn't scorch. I cannot stress the importance of this enough. Here are a few tips to ensure that doesn't happen:
If the water under your double boiler is boiling, you obviously increase the chance of your chocolate scorching. Keep the water simmering, not boiling.
As you stir the chocolate be sure to scrape the bottom of the bowl with a rubber spatula as you stir. If you just lightly stir you can burn the chocolate on the bottom of the bowl and that will ruin the whole lot.
Once the chocolate is melted, dip the crackers one by one using a fork. Tap the fork lightly on the side of the bowl to ensure the chocolate coating is even over the cracker. Place on the cold cookie sheet. Once all the crackers are dipped, transfer to the fridge to set.


Enjoy!!
Tuesday, September 7, 2010
Cookie #75 - Peanut Butter Patties/Tagalongs
Since the Girl Scouts discontinued the Lemon Pastry Cremes, I had to find a new favorite Girl Scout cookie. The Lemon Chalet Creams don't come anywhere near the LPCs. The cookies were lightly glazed and the filling was sweet and tart. Oh, how I loved them and could eat an entire box in one sitting.
Now that I think about it, it's probably a good thing they stopped making them.
Then I discovered the Peanut Butter Patty. Bad news, I tell you. Bad, bad news.
Once I buy a box (or three) they instantly go into the freezer to "ripen." Once frozen, I eat the chocolate & cookie around the edges leaving a perfect mini tower of cookie and peanut butter topped with just enough chocolate.

Cookie Base:
1 cup butter
1/2 cup confectioner's sugar
2 cups flour
1/4 tsp salt
1 tsp vanilla
Filling*:
1/2 cup butter
1/2 cup peanut butter
1 tsp vanilla
1 tbsp milk
2-2 1/2 cups sifted powdered sugar
OR
About 3/4 cup peanut butter
Coating**:
1 cups semisweet chocolate chips
1 tablespoons vegetable shortening.
First, make the cookies:
Beat butter and sugar together until smooth. Mix in vanilla. Sift together flour and salt. Add slowly to butter mixture until well combined. Flatten dough into a disc, wrap tightly with plastic wrap and refrigerate for at least 1 hour.
Preheat oven to 350 degrees.
Roll chilled dough out on a well floured surface to about 1/4" thick. Cut out dough with a 2" circle cookie cutter. Transfer circles to parchment lined baking sheets. Bake for 8-10 minutes until edges are just lightly golden. Transfer to a wire rack to cool.
Meanwhile, prepare the filling.
Cream butter and peanut butter together until smooth and well combined. Mix in vanilla and milk.
With the mixer on low, gradually add powdered sugar until creme reaches desired consistency. If the mixture gets too firm, add a little milk. Too thin, add more powdered sugar.
Place a teaspoon or so of the peanut butter filling on each cookie. Place cookies on a cookie sheet and transfer to the freezer for 15-20 minutes, or until the peanut butter is firm.
Place chocolate chips and shortening in a microwave safe bowl. Microwave on half power at 30 second intervals until the chocolate is melted and smooth. Be sure to stir well in between so as not to scorch the chocolate.
Remove cookies from the freezer and dip each cookie into the chocolate until well coated. I used a fork to dip them. Gently tap the fork on the edge of the bowl to shake off the excess chocolate. Place the dipped cookie on the cold cookie sheet. Once all the cookies are dipped, put them back in the freezer to harden.
Enjoy!
*this recipe makes MORE than enough to fill the cookies, I kept the excess and used it as a dip for chocolate.....okay, I ate it with a spoon, but you catch my drift.
**this is the chocolate I used for these cookies. If you choose to use the chocolate coating, simply melt according to the package directions. If you choose the chocolate chip route, you may need more than 1 cup, depending on the amount of cookies you've made. 1 cup was enough for me to dip around 15 cookies.
Now that I think about it, it's probably a good thing they stopped making them.
Then I discovered the Peanut Butter Patty. Bad news, I tell you. Bad, bad news.
Once I buy a box (or three) they instantly go into the freezer to "ripen." Once frozen, I eat the chocolate & cookie around the edges leaving a perfect mini tower of cookie and peanut butter topped with just enough chocolate.
Just like the Samoas, I used a shortbread base for these. Again, I didn't want to use a sugar cookie because I was afraid of the overwhelming sugar. The texture just wouldn't be right, either. The Peanut Butter Patty cookie is crunchy and buttery, but not at all sweet. The shortbread I used was good, but I think I really needed a crispier cookie for this. Even so, they were yummy!
The other problem I had with these cookies was the chocolate coating. It wasn't really a problem, more of an annoyance. I used chocolate chips for the coating. I melted it with a little shortening to aid in keeping the chocolate smooth and easy to work with.
The problem?
The chocolate didn't set as well as I would have liked. These cookies had to be kept in the refrigerator with a piece of parchment between the layers. The chocolate started to melt the second it was left at room temperature. The next time I do this, I'll use candy coating, not chocolate chips, and I think I'll have better success.
For the filling of these cookies, I made half using the same filling I used for the DoSiDos and half using just plain peanut butter. They were good either way. I didn't have a preference for either one. It really depends on how much time you want to invest in these already time intensive cookies.
They really are worth it though...

Peanut Butter Patties
Cookie Base:
1 cup butter
1/2 cup confectioner's sugar
2 cups flour
1/4 tsp salt
1 tsp vanilla
Filling*:
1/2 cup butter
1/2 cup peanut butter
1 tsp vanilla
1 tbsp milk
2-2 1/2 cups sifted powdered sugar
OR
About 3/4 cup peanut butter
Coating**:
1 cups semisweet chocolate chips
1 tablespoons vegetable shortening.
First, make the cookies:
Beat butter and sugar together until smooth. Mix in vanilla. Sift together flour and salt. Add slowly to butter mixture until well combined. Flatten dough into a disc, wrap tightly with plastic wrap and refrigerate for at least 1 hour.
Preheat oven to 350 degrees.
Roll chilled dough out on a well floured surface to about 1/4" thick. Cut out dough with a 2" circle cookie cutter. Transfer circles to parchment lined baking sheets. Bake for 8-10 minutes until edges are just lightly golden. Transfer to a wire rack to cool.
Meanwhile, prepare the filling.
Cream butter and peanut butter together until smooth and well combined. Mix in vanilla and milk.
With the mixer on low, gradually add powdered sugar until creme reaches desired consistency. If the mixture gets too firm, add a little milk. Too thin, add more powdered sugar.
Place a teaspoon or so of the peanut butter filling on each cookie. Place cookies on a cookie sheet and transfer to the freezer for 15-20 minutes, or until the peanut butter is firm.
Place chocolate chips and shortening in a microwave safe bowl. Microwave on half power at 30 second intervals until the chocolate is melted and smooth. Be sure to stir well in between so as not to scorch the chocolate.
Remove cookies from the freezer and dip each cookie into the chocolate until well coated. I used a fork to dip them. Gently tap the fork on the edge of the bowl to shake off the excess chocolate. Place the dipped cookie on the cold cookie sheet. Once all the cookies are dipped, put them back in the freezer to harden.
Enjoy!
*this recipe makes MORE than enough to fill the cookies, I kept the excess and used it as a dip for chocolate.....okay, I ate it with a spoon, but you catch my drift.
**this is the chocolate I used for these cookies. If you choose to use the chocolate coating, simply melt according to the package directions. If you choose the chocolate chip route, you may need more than 1 cup, depending on the amount of cookies you've made. 1 cup was enough for me to dip around 15 cookies.
Monday, September 6, 2010
Cookie #74 - Samoas
19% of all Girl Scout cookies sold are Samoas/Caramel deLites making it one of the top selling GS cookies, just behind Thin Mints.
When I set out to make both this and the Tagalong/Peanut Butter Patties, I chose to use the same cookie base - a thinly rolled shortbread. My original thought was to use a sugar cookie, but that would bring too much sweetness to the party. The topping for both cookies is already sugar-laden, I didn't want the cookie to be overwhelmingly sweet.
For this post, I'll concentrate on how I did the Samoas:
Samoas/Caramel deLites
Cookie Base:
1 cup butter
1/2 cup confectioner's sugar
2 cups flour
1/4 tsp salt
1 tsp vanilla
Topping:
1 1/2 cups sweetened flake coconut
1-14 oz bag caramels
1 tbsp milk
1 cup semisweet chocolate chips
1 tbsp shortening
Beat butter and sugar together until smooth. Mix in vanilla. Sift together flour and salt. Add slowly to butter mixture until well combined. Flatten dough into a disc, wrap tightly with plastic wrap and refrigerate for at least 1 hour.
Preheat oven to 350 degrees.
Roll chilled dough out on a well floured surface to about 1/4" thick. Cut out dough with a 2" circle cookie cutter. Transfer circles to parchment lined baking sheets. Bake for 8-10 minutes until edges are just lightly golden. Transfer to a wire rack to cool.
Meanwhile, prepare the topping.
Place coconut in a large frying pan and place over low heat. Keep stirring the coconut - DON'T WALK AWAY!! Don't think: "Hey - lemme pour myself a glass of Pinot while this coconut is toasting." Don't do it! It will burn and then you will have to make your poor husband/wife/significant other, who isn't 2 glasses into a bottle,run to the grocery store to get another bag of coconut because you burned this one. Don't ask me how I know...just don't do it.
So, keep stirring the coconut until it is fragrant and toasted. Immediately remove from the pan to a bowl. Don't leave it in the hot pan or it will burn and burnt coconut is stinky.
Place unwrapped caramels in a microwave safe bowl with the milk. Microwave for 30 seconds at a time, stirring well in between, until caramels are fully melted and smooth. Stir coconut into the caramel until well combined.

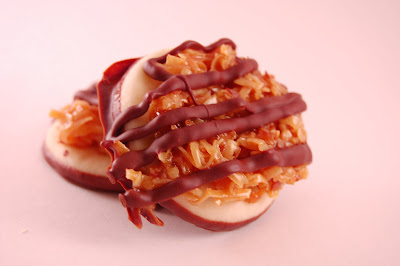
What is it about these cookies?
The sweet, toasty coconut bathed in caramel.
The soft, buttery cookie.
The smooth dark chocolate.
Whatever it is, they sure are scrumptious.
When I set out to make both this and the Tagalong/Peanut Butter Patties, I chose to use the same cookie base - a thinly rolled shortbread. My original thought was to use a sugar cookie, but that would bring too much sweetness to the party. The topping for both cookies is already sugar-laden, I didn't want the cookie to be overwhelmingly sweet.
For this post, I'll concentrate on how I did the Samoas:
Samoas/Caramel deLites
Cookie Base:
1 cup butter
1/2 cup confectioner's sugar
2 cups flour
1/4 tsp salt
1 tsp vanilla
Topping:
1 1/2 cups sweetened flake coconut
1-14 oz bag caramels
1 tbsp milk
1 cup semisweet chocolate chips
1 tbsp shortening
Beat butter and sugar together until smooth. Mix in vanilla. Sift together flour and salt. Add slowly to butter mixture until well combined. Flatten dough into a disc, wrap tightly with plastic wrap and refrigerate for at least 1 hour.
Preheat oven to 350 degrees.
Roll chilled dough out on a well floured surface to about 1/4" thick. Cut out dough with a 2" circle cookie cutter. Transfer circles to parchment lined baking sheets. Bake for 8-10 minutes until edges are just lightly golden. Transfer to a wire rack to cool.
Meanwhile, prepare the topping.
Place coconut in a large frying pan and place over low heat. Keep stirring the coconut - DON'T WALK AWAY!! Don't think: "Hey - lemme pour myself a glass of Pinot while this coconut is toasting." Don't do it! It will burn and then you will have to make your poor husband/wife/significant other, who isn't 2 glasses into a bottle,run to the grocery store to get another bag of coconut because you burned this one. Don't ask me how I know...just don't do it.
So, keep stirring the coconut until it is fragrant and toasted. Immediately remove from the pan to a bowl. Don't leave it in the hot pan or it will burn and burnt coconut is stinky.
Place unwrapped caramels in a microwave safe bowl with the milk. Microwave for 30 seconds at a time, stirring well in between, until caramels are fully melted and smooth. Stir coconut into the caramel until well combined.
Drop one tablespoon full of the coconut caramel mixture onto each cookie. With moistened fingers, flatten the caramel mixture onto each cookie until the mixture covers the cookie. Don't flatten it too much, you want it to still look a little fluffy. Set aside to cool.

Meanwhile, place an empty cookie sheet in the freezer.
Place chocolate chips and shortening in a microwave safe bowl. Microwave on half power at 30 second intervals until the chocolate is melted and smooth. Be sure to stir well in between so as not to scorch the chocolate.
Remove cookie sheet from the freezer. One at a time, dip the bottom of each cookie into the chocolate and place on cold cookie sheet. This will help you achieve nice, smooth bottoms and half the chocolate set so they don't slide all over. Once all the cookies are dipped, place the remaining melted chocolate in a zip top bag. Snip the corner of the bag, just a bit, and drizzle the chocolate over the cookies. Put the cookies into the fridge to fully set.

Enjoy! With or without the Pinot.
Subscribe to:
Posts (Atom)