Tuesday, June 29, 2010

Cookie #16 - Chocolate Maple Bacon

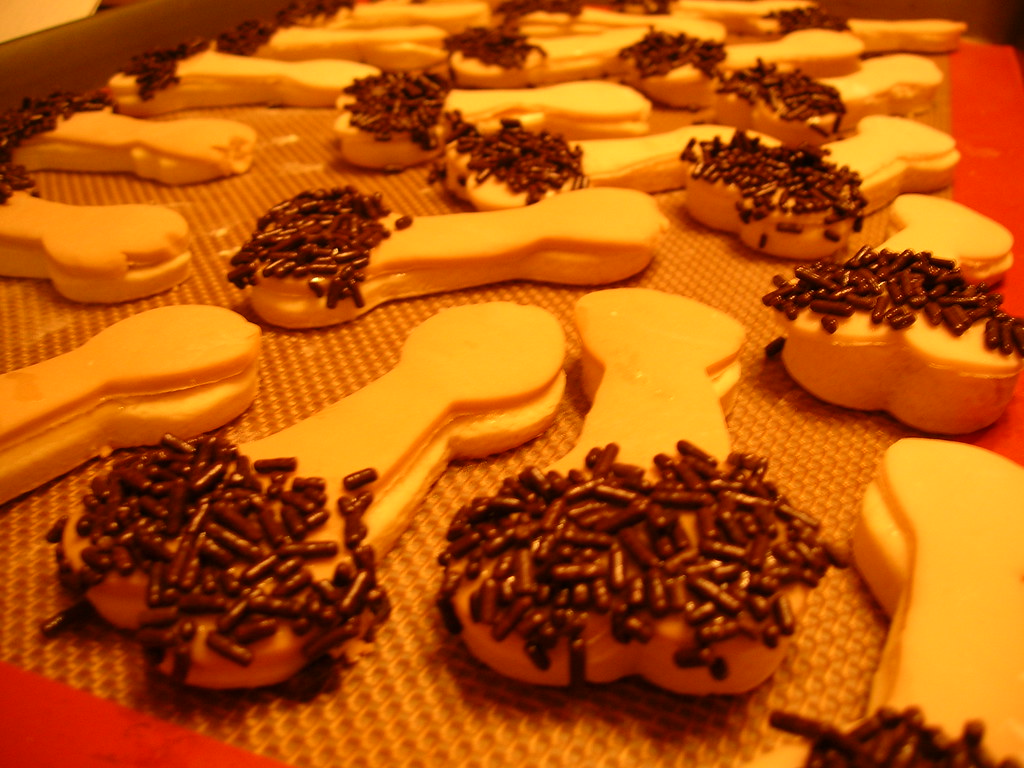
My husband loves bacon.  When I brought up this cookie idea to him, he just about jumped out of his seat with excitement.  So, here we have Corey's cookie:  chocolate wafer with a cinnamon maple frosting and candied bacon topping.  The smokiness of bacon really blends well with the sweetness of the frosting and chocolate and the maple reminds me of Sunday breakfast.  My husband found the candied bacon to contribute too much sweetness to this cookie package.  The next time I make it (which will be soon if Corey gets his way), I'll probably try just crispy cooked bacon, rather than the brown sugar candied variety.  Here's what I did:

Chocolate Cookies with Maple Cinnamon Frosting and Candied Bacon

1 recipe of Vanilla Buttercream Frosting (or a can of prepared white frosting)
1/2 cup pure maple syrup (use the good stuff)
1 teaspoon cinnamon
4-6 slices of bacon
1/2 - 3/4 cup brown sugar

Prepare the chocolate wafer cookies as directed, slicing about 1/4 " thick.  Bake as directed and allow to cool.  Meanwhile, prepare the toppings.
Preheat oven to 350 degrees.  Line a rimmed cookie sheet with aluminum foil and spray with cooking spray.  Lay bacon strips on in one layer.  Sprinkle brown sugar over the bacon until it is well coated.  Bake the bacon for about 20-25 minutes until the bacon is thoroughly cooked.  Remove immediately from the cookie sheet to a Silpat or piece of parchment to cool.  Once cool, cut bacon into small pieces (it'll be too sticky to crumble).
Prepare the frosting as directed (or put entire can of frosting in a bowl).  Whisk in cinnamon and maple syrup until well combined. 
Once the cookies have cooled, frost each cookie with the frosting and add about 5 or so bacon pieces to the top of each cookie. 

Monday, June 28, 2010

Cookie #15 - Chocolate Peanut Butter

Whenever I bite into a frozen Reese's Peanut Butter cup, I'm instantly transported back to the summers of my younger days at our community pool.  The snack bar sold frozen candy bars and next to Snickers, Reese's were my favorite.  I love peanut butter.  I could eat a whole jar with a spoon.
For the chocolate/peanut butter combination, I didn't want to just slap some peanut butter on a chocolate cookie.  Enter:  chocolate peanut butter ganache.  The cookie dough really lends itself to being formed in various shapes, so I utilized a mini muffin pan to make the cup shape. Here's how I did it:


1 cup heavy cream
1 1/2 cups semisweet chocolate chips
4 tablespoons unsalted butter
3/4 cup confectioner's sugar
1/2 cup smooth peanut butter
1/2 cup roasted, salted peanuts

Make the cookie recipe as directed.  After slicing roughly 1/4" thick, place each slice in the cup of a mini-muffin tin.  Press down gently to mold the dough to the shape of the cup.  Bake for 6 minutes at 350 degrees, rotate pan and continue baking for another 6 minutes.  Remove the pan from the oven.  If the cookies are still puffy, that's okay.  Just smoosh them down using the back of a spoon or this nifty tart shaper.  Allow the cookies to cool in the pan for 10-15 minutes, then remove to a wire rack to finish cooling. 
In the meantime, make the ganache:
Combine heavy cream, unsalted butter and confectioner's sugar in a small saucepan over medium-low heat.  Watch carefully. stirring often, as you heat the cream until the butter is melted and bubbles are forming around the sides of the pan.  You don't want to bring it to a boil - you'll risk scorching the milk. 
In a heat safe bowl, add chocolate chips and peanut butter.
Once the milk is hot, pour over the chocolate chips/peanut butter and start whisking.  Keep whisking until the chocolate and peanut butter are melted and the mixture is glossy.  This may take a few minutes, so be patient.  Set the bowl aside to cool. 
Once your cookie cups are cooled, pour the chocolate peanut butter ganache into each of the cups until they're just under full.  Garnish with peanuts. 
You can refrigerate these to get the ganache to set up to a truffle like consistency, or leave them at room temperature and they'll be just slightly runny and delicious.  I kind of like the more liquidy filling.  It coats your tastebuds just right.

Sunday, June 27, 2010

Cookie #14 - Chocolate Orange

My first flavor combination of this series is one of my favorite:  chocolate and orange. 
I have this fond memory of my father bringing home these little chocolates.  I was reluctant to try them at first, doubting that orange and chocolate would go together. After some convincing I popped one in my mouth and fell in love.  There's something about the way the citrus melds with the creaminess of the chcolate that is just out of this world.


For this cookie, I had to make some preparation a bit far in advance.  It involved making orange scented turbinado sugar.  I put about a cup of turbinado sugar (I used Sugar in the Raw) in a small resealable plastic container.  Into the sugar, I nestled about five 2" pieces of orange peel.  I sealed the container loosely, and set it on top of my fridge for a week.  Before I made these cookies, I poured the sugar from the container into a plastic baggie and broke up the clumps that had formed.  The result was a sweet, orange flavored sugar.

Using the chocolate wafer cookie recipe from yesterday, I added 1 tablespoon of grated orange zest to the dough the same time I added the butter.  After rolling the dough into a log, I let it chill in the freezer for about 30 minutes.  I then removed it from the plastic wrap and rolled the whole log in the orange sugar.  I rewrapped the dough and returned it to the fridge for another 30 minutes before slicing and baking as per the recipe.

The resulting cookie had a wonderful orange flavor, and the sugared edges added some crunch to the already crispy cookie.

Saturday, June 26, 2010

Cookie #13 - Chocolate Wafer Cookie

For the next week, I'll be experimenting with different chocolate flavor combinations.  Some expected, some not so.  When I came across this chocolate wafer cookie recipe, I knew it would be the perfect base.  It's just a simple, plain chocolate cookie and is quite good on it's own.  After adding some other ingredients, I've come up with six different chocolate cookies to share. 

We'll start with the basic chocolate wafer that I found at Smitten Kitchen.  What I especially like about these cookies is that they're made in a food processor, rather than a stand mixer.  So easy.  I made some adjustments to the recipe. 

Chocolate Wafer Cookies from Smitten Kitchen

1 1/2 cups AP Flour

3/4 cup unsweetened cocoa powder
1 cup plus 2 tablespoons sugar
1/4 teaspoon salt
1/4 teaspoon baking soda
14 tablespoons (1 3/4 sticks) unsalted butter cut into cubes
3 tablespoons whole milk
1 teaspoon pure vanilla extract

In the bowl of a food processor, combine flour, cocoa powder, sugar, salt and baking soda.  Pulse a few times to combine.  Add cubed butter and pulse about 10 times.  Combine milk and vanilla and add to mixture while food processor is on.  Continue mixing until dough forms a ball around the blade.
Transfer dough to a bowl and knead to be sure the mixture is well combined.  Shape into a 14" log and wrap tightly in plastic wrap or waxed paper.  Chill dough at lease 45 minutes.
Preheat oven to 350 degrees.  Slice dough to desired thickness (I did mine 1/4") and transfer to a parchment lined baking sheets, about an inch apart. 
Bake 13-15 minutes, rotating cookie sheets halfway through the baking time.  As Smitten Kitchen describes, the cookies will puff up and then deflate.  They are done when they've deflated.  Transfer to a wire rack to cool.

Friday, June 25, 2010

Cookie #12 - Cinnamon Toast Crunch

While researching cereal-themed cookies, I came across this great recipe at Maple <3 Spice, a vegan food blog.  These cookies were just so stinking adorable, I knew I had to adapt them for this experiment.  Sure, I could've gone the vegan route, but hey, I like me some butter.  Some real, delicious, fatty butter.  Yum. 
So, I made some adjustments and topped the shortbread with a crunchy cinnamon topping and sweet drizzle to mimic the cereal. 
The worst part of these cookies is that fact that they take THIRTY MINUTES to bake and the smell of cinnamon goodness wafts through the house calling to you......  You have to be patient.  Trust me.  It's worth it. 

Cinnamon Toast Crunch Cookies

1/2 cup butter
1/4 cup sugar
1 egg yolk
2 tbsp cornstarch
1 cup AP flour

Topping: 
2 tbsp turbinado sugar
2 tsp cinnamon

Glaze:
1/2 cup powdered sugar
2 tbsp milk

Cream butter and sugar.  Add egg yolk.  Sift together cornstarch and flour, add to butter/sugar/egg.  Form the dough into a log.  Shape the log so it's rounded on one side and straight on the other three.  Using a chopstick (or unsharpened pencil like I did) make two indents on either side of the log towards to rounded top.  Chill for 30 minutes.
Preheat oven to 300 degrees.  Slice the cookies into 1/4" slices and place on a parchment lined baking sheet.  Bake for 30 minutes or until edges are slightly browned.  Transfer to a wire rack to cool.
Whisk powdered sugar and milk together into a thin glaze.  After the cookies cool, drizzle with glaze. 

The picture posted was taken right before baking.  I chilled the dough really well after slicing and before baking and they did not spread at all.  They retained their sliced bread shape perfectly.

Thursday, June 24, 2010

Cookie #11 - Corn Pops Cookie

Another entry into my top five cereals is Corn Pops.  I love how they get squishy in milk and how dry, they're slightly sticky. 
I knew I wanted to attempt a cornmeal cookie and I figured it would be the perfect vehicle to try and duplicate that Corn Pop flavor.
I'm happy to announce:  I SUCCEEDED! 
I'm doing to super happy cookie success dance in my living room right now. 
The cookies have the texture of cornbread because of the cornmeal.  I added honey to the mix and topped them with a honey glaze.  The two flavors combined and these cookies taste just like a big bowl of Corn Pops.

So I took this batch of cookies to share with my eager co-workers and I forgot to take a picture. 

Corn Pop Cookies

1/2 cup butter
2/3 cups granulated sugar
1 egg
1 tsp vanilla
1/2 cup cornmeal
1 tsp baking powder
1/4 tsp salt
1 cup flour
1 tbsp honey

Glaze:
1 cup powdered sugar
2 tbsp honey
2-4 tbsp milk

Preheat oven to 375 degrees.
Cream butter and sugar together.  Add egg and vanilla until well combined.  Add salt, baking powder and cornmeal.  Add flour slowly.  Mix in honey.
Drop by rounded tablespoons onto parchment lined baking sheets.  Bake for 8-10 minutes until golden brown around the edges.  Transfer to a wire rack to cool
For glaze:  whisk sugar, honey and milk together to form a loose glaze.  Spoon over warm cookies.

Wednesday, June 23, 2010

Cookie #10 - Honey Nut Cheerios

For this cookie, I attempted to capture the sweet, crunchy, nuttiness of the classic Cheerio flavor Honey Nut.  Using a peanut butter cookie as the base, I mixed in some honey, honey-roasted peanuts and, of course, Cheerios.  I used the original oat Cheerios instead of the Honey Nut.  Since I was using the cookie to provide the honey nut flavor, I didn't want to over power it with the Honey Nut Cheerios, too.

My husband enjoyed them, though he felt they were a little dry.  I didn't think so, because I like a drier peanut butter cookie.  When I formed the cookies, I flattened half the batch like a traditional peanut butter cookie and kept the other batch in the ball shape.  Both worked out well.

Honey Nut Cheerio Cookies

1/2 cup butter
1/2 cup peanut butter
1/2 cup granulated sugar
1/2 cup honey
1 egg
2 tsp baking soda
1 tsp salt
1 tsp vanilla
2 1/2 cups flour
1 1/2 cups Cheerios
3/4 cup honey roasted peanuts 

Preheat oven to 375 degrees.
Cream butter, peanut butter, sugar and honey together.  Mix in egg and vanilla.
In a medium bowl, whisk together flour, baking soda and salt.  Add to the butter/egg mixture in batches mixing well after each addition.  Fold in cheerios and peanuts.

Drop by rounded tablespoons onto parchment lined baking sheets.  Bake for 12-15 minutes until they just start to turn golden brown.  Transfer to a wire rack to cool.

Tuesday, June 22, 2010

Cookie #9 - Raisin Bran Cookies

My husband loves Raisin Bran.  I love watching him try to eat a bowl while Sydney picks the raisins out.  I really wanted this cookie to come out like a soft, chewy, fluffy oatmeal cookie.  Instead, they fell flat.  Literally.  In retrospect, I needed baking powder, not baking soda.  This mistake is the reason I'm doing this experiment - so I learn all the quirks of creating your own cookie recipes.  So I give you the recipe to critique.  The flavor was fantastic - they tasted just like Raisin Bran cereal.  I just need to work on the texture.

Raisin Bran Cookies

1 cup flour
1 cup Raisin Bran
1/2 cup white sugar
1/2 cup brown sugar
1/2 cup butter, softened
1 egg
1 teaspoon cinnamon
1 teaspoon vanilla
1/2 teaspoon baking soda
1 cup raisins

Preheat oven to 350 degrees. 
Cream together butter and sugars.  Add egg and vanilla.
Add flour, cinnamon and baking soda.  Fold in cereal and raisins.
Drop by rounded tablespoons onto parchment lined baking sheets.  Bake for 10 - 12 minutes until done.  Transfer to a wire rack to cool.

I invite any and all constructive criticism to my recipes.  If you have an idea as to why a recipe failed or what might make it better, please feel free to leave me a comment.

Monday, June 21, 2010

Cookie #8 - Froot Loop Cookies

Today's cookie starts a 5 cookie series based on breakfast cereal.  I was inspired by Kellogg's variety pack.  I knew immediately I wanted to make cookies inspired by and, in some cases, using America's favorite breakfast cereals.  I start with Froot Loops.

Definitely in my top five cereals, I love the sweet, fruity taste of Froot Loops.  Imagine my excitement when one of my favorite food blogs, gas●tron●o●my blog featured these Froot Loop cupcakes from The Breakfast Cereal Gourmet by David Hoffman.  I made them that night.  They were fantastic.  The flavor was spot on.  I used that flavor profile and transferred it to a thin, crispy sugar cookie and added a lemon glaze.
The result was a cookie with almost the same texture as a Froot Loop.  My husband is a sucker for any sugary cereal and any thin, crispy cookie. He was in love.  He did think the glaze gave the cookies a little too much sweetness.  Perhaps with the next batch I'll leave out the glaze and place the Froot Loops right on the cookies before baking, just like the cupcakes. 

Froot Loop Cupcakes

2 1/2 cups all purpose flour
1 1/2 cups granulated sugar
1 cup softened butter
2 eggs
1 tbsp lemon zest
1 tbsp orange zest
1 1/2 tsp cream of tartar
1 tsp taking soda
1 tsp vanilla
1/4 tsp salt

Glaze:
2 1/2 cups powdered sugar, sifted
1/4 cup lemon juice
1 cup Froot Loops for decoration (optional)

Preheat oven to 400 degrees.
Cream together butter and sugar.  Add eggs, lemon and orange zest, and vanilla. 
In a medium bowl, whisk together flour, cream of tartar, baking soda and salt.
Add to butter/egg mixture in small batches whisking well after each addition. 
Drop by rounded tablespoons onto parchment lined baking sheets.  Bake for 8 - 10 minutes or until edges just start to turn golden.  Transfer to a wire rack to cool for 15 minutes.
While the cookies are cooling, mix together powdered sugar and lemon juice to make the glaze.  If the glaze is too thin, add more sugar.  Too thick? More lemon juice (or orange juice would work, too)
While the cookies are still slightly warm, pool about a teaspoon of glaze on each cookie and top with a few Froot Loops.

Sunday, June 20, 2010

Cookie #7 - Chocolate Espresso Crinkles

I'm sorry I'm so late in posting today's cookie.  Everyone knows today was Father's Day, so today I spent my time catering to my husband's every whim.  Well, not really.  Mostly, I kept the girls out of his hair while he smoke a beef brisket and chicken on his grills in our backyard.  The smell of the mesquite, apple and hickory wafted through the house starting bright and early at seven a.m.  The result: a delectable dinner and a super happy Daddy.  So, Happy Father's Day to all the dads out there.
Now, onto the cookies.
These cookies were Corey's request for Father's Day.  Right around the time I first made these cookies, I was fighting some serious insomnia.  I couldn't figure out why I was staying up until after 1 am when I normally am in bed around 10. 
Yeah.  Chocolate ESPRESSO....and I don't normally drink coffee. 
So, I'm not very cautious about how many of these guys I eat after 8 pm. 

Chocolate Espresso Crinkles

1/2 cup all purpose flour
1/4 cup unsweetened cocoa powder
4 tsp instant espresso powder
1 tsp baking powder
1/8 tsp salt
4 tbsp unsalted butter at room temperature
2/3 cup packed light brown sugar
4 oz bittersweet or semisweet chocolate (I used semisweet), melted & cooled
1 tbsp milk
1/2 cup powdered sugar, for coating

In a small bowl, whisk together flour, cocoa, baking powder, and salt.  With an electric mixer, beat butter and brown sugar until light and fluffy.  Beat in egg until well combined.  Mix in cooled chocolate. 
With mixer on low, gradually add flour mixture, then milk, until just combined.
Flatten dough into a disc and wrap in plastic.  Freeze until firm (about an hour).
Preheat oven to 350 degrees.  Roll dough into 1" balls, coat in powdered sugar.  Place on parchment lined baking sheets, about 2" apart. 
Bake for 12 - 14 minutes, rotating the sheet pans halfway through the baking time.  The cookies will be soft to the touch, but they should spread and the coating should crack.
Transfer to a wire rack to cool.

Friday, June 18, 2010

Cookie #6 - Snickerdoodles

After I let my husband taste test this bath, he wandered into the living room and said:  "You make a mean snickerdoodle." 
I found this recipe on AllRecipes.com.  It's called Mrs. Sigg's Snickerdoodles.  It's an awesome recipe.  The cookie spreads just right creating crispy edges and a soft, squishy center. 


Mrs. Sigg's Snickerdoodles

1/2 cup butter, softened
1/2 cup shortening
1 1/2 cups white sugar
2 eggs
2 teaspoons vanilla extract
2 3/4 cups all-purpose flour
2 teaspoons cream of tartar
1 teaspoon baking soda
1/4 teaspoon salt
2 tablespoons white sugar
2 teaspoons ground cinnamon

Preheat oven to 400 degrees F.

Cream together butter, shortening, 1 1/2 cups sugar, the eggs and the vanilla. Blend in the flour, cream of tartar, soda and salt. Shape dough by rounded spoonfuls into balls.

Mix the 2 tablespoons sugar and the cinnamon. Roll balls of dough in mixture. Place 2 inches apart on ungreased baking sheets.

Bake 8 to 10 minutes, or until set but not too hard. Remove immediately from baking sheets to cool on a wire rack
.

Cookie #5 - Jam Thumbprints

I know several people who love these cookies because they remind them of their childhood.  I never had them until I was an adult. 

What I especially love about this cookie is the various flavor combinations you come up with just by changing the jam and nuts.  For this batch I used almonds and raspberry jam.  I'm told this is the traditional flavor.  I started thinking about various other flavors I could use.....my imagination went wild and I had to come back down to Earth so I could concentrate on these.

The cookie I made is a combination of several recipes I've tried over the years.  I've found this makes and excellent base for the jam.  It's not too rich, not too bland.  Not too hard, not too soft.  Yum. 

Jam Thumbprints

1 cup softened butter
1/2 cup granulated sugar
1/2 cup packed light brown sugar
1 egg
3 1/2 cups AP flour
2 teaspoons baking powder
1/2 teaspoon salt
2 tablespoons milk
2 teaspoons vanilla extract

1 egg white, beaten with about 2 tbsp cool water
1/2 cup raspberry jam (or jam of choice)
1 cup crushed almonds (or nut of choice

Beat butter and sugars together until creamy.  Add egg and beat well. Add vanilla.
In another bowl, combine flour, baking powder and salt. 
Add to butter/egg mixture, alternating between milk and flour, always beginning and ending with flour.  Mix on low speed after each addition until well combined.  Chill dough for at least 2 hours.

Preheat oven to 350 degrees.

Roll dough intol 1 1/2 balls.  Roll balls in egg wash and then nuts.  Place on baking sheet. 
Using your thumb, make a depression in the center of each cookie. 

Bake for 10-15 minutes until golden. 

Immediately out of the oven, press the back of your 1/2 Teaspoon measuring spoon into the depression you made with your thumb.  You must do this while the cookies are still warm so they don't crack.  Fill each depression with jam.  Transfer to a wire rack to cook completely. 

I did to about four cookies from this batch with a little Nutella.  Super yum and just what I needed.

Thursday, June 17, 2010

Cookie #4 - Peanut Butter

In high school, our cafeteria had the best peanut butter cookies ever. They were extra peanut buttery and crumbly. They stuck to your palate making your mouth beg for cold milk.

A few years ago, my best friend gifted me with THE recipe (she has school district connections). Of course, the recipe makes about a hundred cookies. So, after quartering the recipe I tried them out. They just weren't the same. I tried and tried again, but I could never replicate the awesomeness..

So, when I knew that peanut butter cookies would be included in week one of this project, I was eager to retry the recipe.

That was until I lost it.

Somewhere between a wedding, three moves and two babies, my beloved cookie recipe disappeared. So, I consulted my trusty Joy of Cooking. While not the creamy, crumbly cookie of my high school days, they still came out pretty darn good. They do need more peanut butter, though. I think perhaps next time I'll increase the peanut butter and decrease the actual butter. I realize now, after researching various peanut butter cookie recipes that the cookie of my youth probably had little to no flour at all. I've come across a few recipes like that and perhaps I'll have to try one out in the course of this experiment.

This was also my first cookie error of the experiment. I know better and I ignored my baker's instinct.

My kitchen was insufferably hot the day I made these and I neglected to chill the dough before baking. This, of course, caused my cookies to spread to about the size of my hand making the famous crisscross marks almost nonexistent. They were still pretty tasty.

Peanut Butter Cookies (The Joy of Cooking, 1984 edition)

1/2 cup butter or shortening (I used butter)
1/2 cup packed brown sugar
1/2 cup granulated sugar
1 egg
1 cup butter
1/2 teaspoon salt
1/2 teaspoon baking soda
1/2 teaspoon vanilla
1 - 1 1/2 cups flour (sift before measuring)

Preheat oven to 375 degrees.
Beat butter until soft. Add sugars gradually and beat until creamy. Beat in egg, salt, baking soda, and vanilla.
Gradually add flour.
Roll the dough into small balls and placed hem on a parchment lined cookie sheet.
Press flat with a fork to form cross hatches. Bake for 10-12 minutes until they just start to change color.

Wednesday, June 16, 2010

Cookie #3 - Sugar Cookies

Today would have been my father's 90th birthday.  He was well into his fifties when I was born and passed away almost 14 years ago.  I miss him terribly every day.  Since his favorite cookie that I made for him was sugar, I couldn't think of a better way to celebrate his birthday.

These are my go-to cookie. I make them for everything - birthdays, holidays, Wednesdays....

Normally, I roll them and cut them out. Then they're frosted with royal icing or cut out fondant. I"ve made them in a number of different shapes - flowers, apples, baby feet, Pac-Man, music notes, wedding dresses, the state of Ohio, Devo hats (don't ask), and even a certain part of the male anatomy for a friend's bachelorette party. 
This time, I decided to just slice and bake with some simple colored sugar on top. I wanted to keep them pure and let the full flavor of the cookie come through. Often times, the frosting can overpower that warm, toasty, vanilla cookie flavor. I realize that now that I've made them this simplistic way.
The recipe I use is, again, from The Joy of Cooking. It is by far the best sugar cookie recipe I've encountered. Super easy, super quick and super yummy. The cookie trifecta.

Roll Cookies (Joy of Cooking, 1984 edition)

1/2 cup white or brown sugar (I use white)
1/2 cup butter
1 teaspoon vanilla
2 eggs
2 1/2 cups sifted all-purpose flour
2 teaspoons double acting baking powder
1/2 teaspoon salt.

Beat sugar and butter together until creamy.
Beat in vanilla, eggs, flour, bakinkg powder and salt.
Chill the dough for at lease 3-4 hours before rolling.

For this batch, I formed the dough into a log before chilling and then simply sliced and baked them.  I sliced them almost 1/4" thick.  The result was a soft, cakey cookie. 
Preheat the oven to 375 degrees.
When rolling to dough out, use as little flour as possible. Try not to handle the dough too much as it can make the cookies tough.
Bake the cookies for 7-12 minutes.

Tuesday, June 15, 2010

Cookie #2 - Oatmeal Raisin

I've managed to convince myself that if a cookie has something healthy in it (i.e., oatmeal) that you can eat it for breakfast.  Bring on the oatmeal raisin cookie. 
The nutty oatmeal, spicy cinnamon, chewy raisins and sweet brown sugar meld together and remind me of snowy winter afternoons.  Exactly what I needed to beat the heat and humidity of June.  In hindsight, maybe I should've saved this cookie for a hot August day. 
I used the recipe I've always used - right off the Quaker Oatmeal canister.  They're affectionatley called "Vanishing Oatmeal Raisin Cookies." 

Vanishing Oatmeal Raisin Cookies from Quaker Oats

1/2 cup (1 stick) plus 6 tablespoons butter, softened
3/4 cup firmly packed brown sugar
1/2 cup granulated sugar
2 eggs
1 teaspoon vanilla
1-1/2 cups all-purpose flour
1 teaspoon baking soda
1 teaspoon ground cinnamon
1/2 teaspoon salt (optional)
3 cups Quaker® Oats (quick or old fashioned, uncooked)
1 cup raisins
Heat oven to 350°F. In large bowl, beat butter and sugars on medium speed of electric mixer until creamy. Add eggs and vanilla; beat well. Add combined flour, baking soda, cinnamon and salt; mix well. Add oats and raisins; mix well.
Drop dough by rounded tablespoonfuls onto ungreased cookie sheets.
Bake 8 to 10 minutes or until light golden brown. Cool 1 minute on cookie sheets; remove to wire rack. Cool completely. Store tightly covered.

Monday, June 14, 2010

The Rules

I thought I'd take a minute to clarify the rules of this project.  Mostly for myself, but also so you, the reader, understands exactly what I am doing.
How often will I be baking?
My plan is, over the next year, to bake 365 different cookie recipes.  One for each day. 
This does not necessarily mean I will be baking every single day.  I will just be posting a cookie every day.  I need to remember that I am a working mother of two and baking a cookie a day can be a little unrealistic for my already hectic life.  I will have "baking days" where I plan on knocking out three or four batches of cookies in one shot. 
To some people, this may seem crazy. 
"You're going to bake all those cookies??" 
Yes.
The kitchen is my happy place and baking is my therapy.  I find myself at peace when I'm elbow deep in flour, sugar and butter.  There's something about combining all the elements of a recipe and watching them develop into something that is so unlike what you started with.  It's very satisfying. 
It reminds me of a story I read once about the development of cake mixes.  Initially, the cake mixes only required the home cook to add water.  The feedback was so poor because housewives (at that time) didn't feel like they were actually "making" something.  So, they changed the formulation to require eggs and oil. 
What kind of cookies will be included?
Anything that is considered a "cookie."  I plan on starting with the more popular home baked cookies.  Chocolate chip, oatmeal, peanut butter, etc.  Once I get those out of the way, I will continue on with more involved and different cookie recipes.  Some you've heard of, some you haven't. 
Not all my cookies will be sweet - I am planning a week of savory cookies which include flavors like rosemary, thyme and cheese. 
I will also have instances where I will take one simple cookie recipe and reinvent it seven different ways.  "Doctoring" the recipe, if you will. 
My other plan is to make a cookie for each of the 50 states.  The cookie will either be known to come from that state or representative of the food and culture of that state.  I'm most excited for that part because it is allowing me to come up with many of my own recipes. 
Who will be eating all these cookies?
First, I will only be making half batches of all the cookies I make.  The recipes I provide will be for full batches.  I must be conscience of my hips!  My family will taste test the cookies, and the remainder will be given out to various family, friends and other cookie lovers.  The majority of the cookies will be going to the lucky folks in my husband's commuter van pool. 
Where will the recipes come from?
Mostly, I'll be pulling recipes from my collection of new and vintage cookbooks.  Some I've found on the internet and some are old family recipes that have been passed down from my Great-Grandmother.  Either way, I will be sure to give credit where credit is due and links will be provided when available.
I will also be concocting my own recipes.  I know they won't all be good, but I'm hoping at least some of them will come out. 
I'd also like to take this opportunity to invite any of you out there who may be reading this to submit your recipes to me.  I'm on the prowl for new and different, but also for something that may be an important culinary part of your lives. 
I look forward to embarking on the journey and I hope you'll follow along with me....

Cookie #1 - Nestle Tollhouse Chocolate Chip Cookies


These were the very first cookies I ever learned how to make. 
These were the very first cookies I ever taught someone how to make.  (I remember helping everyone in my junior hight Home-Ec class)
They are the type of cookie that just envokes this feeling of home and comfort.  There's something about eating one right out of the oven or dunking them in a cold glass of milk. 
ANYONE can make these - and no, I don't mean just opening up a tube and plopping them on a cookie sheet (though this was my preferred method when I was pregnant with my first daughter).  I mean honest to goodness make them from scratch.  No expensive, hard to get ingredients.  Chances are, if you cook at all, you already have the ingredients in your pantry and fridge. 
The best part is you can bake this one recipe a few different ways:  as cookies, as a cookie cake or as a bar cookie.  All you do is vary the pan and cooking time. 

So, I thought this classic cookie would be the ideal first cookie for this project.  With a little help from Sydney, I mixed together the ingredients and soon my kitchen was filled with the smell of fresh baked cookies.  They were as good as I remember.

Tollhouse Chocolate Chip Cookies

2 1/4 cups all-purpose flour
1 teaspoon baking soda
1 teaspoon salt
1 cup butter or margarine, softened
3/4 cup granulated sugar
3/4 cup packed brown sugar
1 teaspoon vanilla extract
2 large eggs
1 (12 ounce) package NESTLE® TOLL HOUSE® Semi-Sweet Chocolate Morsels
1 cup chopped nuts (these are optional and I chose to omit them)

PREHEAT oven to 375 degrees F.


COMBINE flour, baking soda and salt in small bowl. Beat butter, granulated sugar, brown sugar and vanilla extract in large mixer bowl until creamy. Add eggs one at a time, beating well after each addition. Gradually beat in flour mixture. Stir in morsels and nuts. Drop by rounded tablespoon onto ungreased baking sheets.

BAKE for 9 to 11 minutes or until golden brown. Cool on baking sheets for 2 minutes; remove to wire racks to cool completely.

Friday, June 11, 2010

The experiment.

One cookie, everyday, for a whole year.  365 different recipes. 
My hope for this endeavor is that it will better me as a baker, a writer, a photographer and a get-things-done-r. 
So it begins - on Monday, June 14th, 2010 I will bake my first cookie of this experiment:  the Famous Tollhouse Chocolate Chip Cookie. 
Stay tuned.....